써먹는 웹개발
[Java] 10강 생성자 호출과 정의 본문
10 생성자 호출과 정의
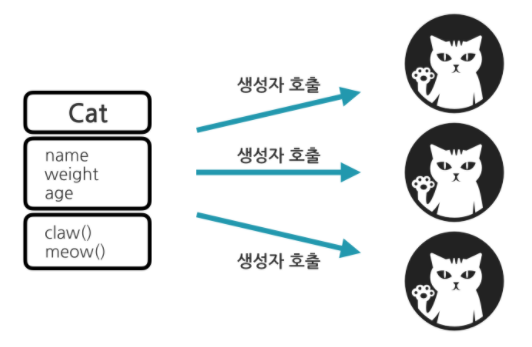
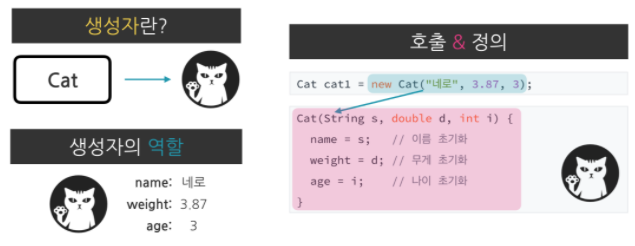
1. 생성자란
- 객체를 만드는 특별한 메소드
※ 이렇게도 사용가능
|
1
2
3
4
5
6
7
|
function Cat cat(){
return new Cat();
}
Cat cat0 = cat();
Cat cat1 = cat();
Cat cat2 = cat();
|
cs |
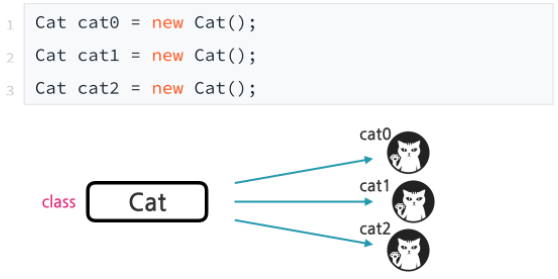
2. 생성자의 2가지 역할
1) 객체 생성 : 객체를 만드는 것
2) 객체 초기화 : 객체의 필드 값을 설정하는 것
이전 방식 : 객체 따로, 초기화 따로 진행
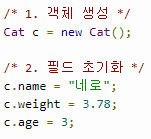
생성자 활용 방식

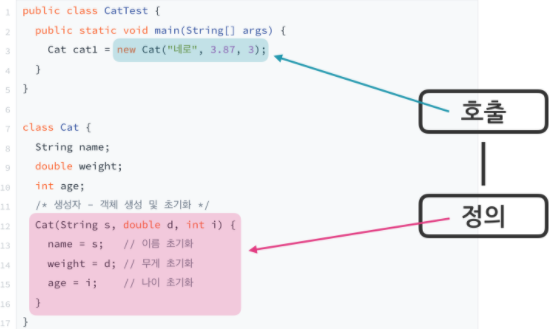
3. 생성자 호출과 정의
- 생성자 또한 메소드이다. 따라서 호출과 정의로 나뉘어 사용된다.
- 생성자와 일반 메소드와의 차이는 생성자는 리턴 타입이 없고, 메소드는 리턴 타입이 있다.
4. 요약
5. 개념 실습

1. 생성자 호출로 객체 초기화
public class BicycleTest {
public static void main(String[] args) {
// 객체 생성 및 초기화
Bicycle b1 = new Bicycle("부릉2", 21.74, 899000);
Bicycle b2 = new Bicycle("씽씽2", 12.57, 495000);
// 객체 정보 출력
System.out.printf("Bicycle { %s, %.2fkg, %d원 }\n", b1.name, b1.weight, b1.price);
System.out.printf("Bicycle { %s, %.2fkg, %d원 }\n", b2.name, b2.weight, b2.price);
}
}
class Bicycle {
// 필드
String name;
double weight;
int price;
// 생성자 - 파라미터를 통한 초기화
Bicycle(String n, double w, int p) {
name = n;
weight = w;
price = p;
}
}
2. String.format() 메소드
public class GorokeTest {
public static void main(String[] args) {
/* 1. TOP 3 고로케를 객체로 만드세요. */
Goroke g1 = new Goroke("피자",1000);
Goroke g2 = new Goroke("야채",800);
Goroke g3 = new Goroke("팥",500);
/* 2. 고로케 정보를 출력하세요. */
System.out.println(g1.str());
System.out.println(g2.str());
System.out.println(g3.str());
}
}
class Goroke {
// 필드
String name;
int price;
// 생성자
Goroke(String n, int p) {
name = n;
price = p;
}
// 메소드
String str() {
return String.format("Goroke { name: %s, price: %d원 }", name, price);
}
}
3. 생성자 정의하기
public class HeroTest {
public static void main(String[] args) {
// 객체 생성
Hero ironMan = new Hero("아이언맨", 80);
Hero thanos = new Hero("타노스", 160);
Hero thor = new Hero("토르", 150);
Hero groot = new Hero("그루트", 40);
// 모든 객체 정보를 출력
System.out.println(ironMan.toStr());
System.out.println(thanos.toStr());
System.out.println(thor.toStr());
System.out.println(groot.toStr());
}
}
// Hero 클래스
class Hero {
// 필드
String name;
int hp;
// 생성자
Hero(String n, int h/* 1. 파라미터를 추가하세요. */) {
/* 2. 필드 값을 초기화하세요. */
name = n;
hp = h;
}
// 메소드
String toStr() {
return String.format("Hero { name: %s, hp: %d }", name, hp);
}
}
4. 사라진 디폴트 생성자
public class DrinkTest {
public static void main(String[] args) {
// 디폴트 생성자로 객체 만들기
Drink d1 = new Drink();
d1.name = "포카리";
d1.price = 1000;
// 다른 생성자로 객체 만들기
Drink d2 = new Drink("박카스", 800);
// 모든 객체 출력
System.out.println(d1.toStr());
System.out.println(d2.toStr());
}
}
// 드링크 객체
class Drink {
// 필드
String name;
int price;
/* 1. 디폴트 생성자를 추가하세요. */
Drink() {}
// 생성자
Drink(String n, int p) {
name = n;
price = p;
}
// 메소드
String toStr() {
return String.format("Drink { name: %s, price: %d }", name, price);
}
}
5. 객체 배열 만들기
public class SongTest {
public static void main(String[] args) {
// 객체 생성
Song s0 = new Song("별헤는 밤", "유재하");
Song s1 = new Song("비상", "임재범");
Song s2 = new Song("비밀", "박완규");
// 객체 배열 생성
Song[] songs = {
/* 1. 배열 요소를 채워주세요. */
s0, s1, s2
};
// 모든 배열 속 객체 출력
for (int i = 0; i < songs.length; i++) {
/* 2. 객체 정보를 출력하세요. */
System.out.println(songs[i].toStr());
}
}
}
class Song {
// 필드
String name;
String singer;
// 생성자
public Song(String n, String s) {
name = n;
singer = s;
}
// 메소드
String toStr() {
return String.format("Song { name: %s, singer: %s }", name, singer);
}
}
6. 파라미터로 객체 전달
public class HeroTest {
public static void main(String[] args) {
// 객체 생성
Hero thor = new Hero("토르", 150); // thor -> {"토르", 150}
Hero thanos = new Hero("타노스", 160); // thanos -> {"타노스", 160}
// 토르의 펀치 -> 타노스
thor.punch(thanos);
/* 2.코드를 추가하여 펀치를 주고 받으세요. */
thanos.punch(thor);
thanos.punch(thor);
}
}
class Hero {
// 필드
String name;
int hp;
// 생성자
Hero(String s, int i) {
name = s;
hp = i;
}
// 메소드
void punch(Hero enemy) {
// 때린 주체 객체
System.out.printf("[%s]의 펀치!! ", name);
/* 1. 맞은 객체에 대한 정보를 출력하세요. */
System.out.printf("%s의 HP: %d -> ", enemy.name, enemy.hp);
enemy.hp = enemy.hp - 10;
System.out.printf("%d\n",enemy.hp);
}
}
7. 리뷰: 마린과 메딕
public class Starcraft {
public static void main (String[] args) {
// 객체 생성
Star s1 = new Star("모랄레스",60,60);
Star s2 = new Star("레이너",80,0);
// 마린의 스팀팩!
s2.stimpack();
// 메딕의 힐!
s1.heal(s2);
}
}
class Star {
String name;
int hp;
int mp;
Star(String n, int h, int m) {
name = n;
hp = h;
mp = m;
}
void stimpack(){
System.out.printf("[%s]의 스팀팩! HP: %d -> ", name, hp);
hp -= 10;
System.out.printf("%d",hp);
}
void heal(Star myteam){
System.out.printf("[%s]의 치유! => [%s] HP(%d -> ", name, myteam.name, myteam.hp);
myteam.hp += 10;
System.out.printf("%d)",myteam.hp);
}
}
강의 출처 : cloudstudying.kr/lectures/197
'Study > Java & Python' 카테고리의 다른 글
| [Java] 12강 접근 제한자와 게터(getter)&세터(setter) (0) | 2021.02.25 |
|---|---|
| [Java] 11강 레퍼런스와 static편 학습 내용 보내드립니다. (0) | 2021.02.25 |
| [Java] 9강 클래스와 객체 (0) | 2020.11.23 |
| [Python Study] 2. 두번째 데이터 타입, String (0) | 2019.01.03 |
| [Python Study] 1. 첫번째 데이터 타입, Number (0) | 2019.01.03 |