
- 전체보기 (632)

- Today
- Total
써먹는 웹개발
상세 에러메시지 : ERROR [org.springframework.scheduling.quartz.LocalDataSourceJobStore] ClusterManager: Error managing cluster: Failure obtaining db row lock: Lock wait timeout exceeded; try restarting transaction org.quartz.impl.jdbcjobstore.LockException: Failure obtaining db row lock: Lock wait timeout exceeded; try restarting transaction 개발서버 실행중에 로컬 서버 실행했을때 스케쥴러가 꼬이면서 발생한 에러 임시 해결 : 개발서버 정지 후에 로컬..
 [Intellij] 커뮤니티(community) 버전에서 톰캣(tomcat) 추가가 안되는 이유
커뮤니티 버전에서는 톰캣을 지원하지 않기 때문입니다. 라이센스 구매후에 이용 가능합니다.
 [ERWin] Logical/Physical 이미지 다운로드
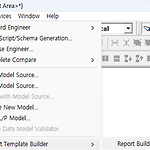
1. 원하는 모델 선택 : Logical/Physical 2. Tools > Report Template Builder > Report Builder... 3. New 버튼 클릭 4. Graphical > Picture 더블클릭 ('Picture' section이 Report Layout에 출력됨) 5. 내려받기(Run) 버튼 클릭 - 아래 화살표 아이콘이 내려받기
 [ERWin] 논리(Logical) 컬럼명을 물리(Physical) 컬럼의 Comment로
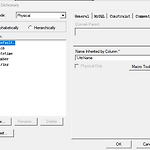
1. Physical Model을 선택한 후 좌측 트리에서 Domains선택 2. Model > Domain Dictionary 선택하고 Edit Mode를 Logical로 선택 3. Commnet탭의 하단에 Name Inherited by Attribute에 '%ColumnComment' 입력 4. 물리 테이블의 컬럼명을 고정시킨다. - 적용할 테이블 선택 후에 배경화면 우클릭 Harden Physical Names 5. 테이블 더블클릭해서 reset버튼 클릭 6. Comment 체크하고 OK 참고 : https://hsohe74.tistory.com/46 [Blue sky, wind, cloud and knulf:티스토리]
 [Linux Nginx] URL로 NAS 경로 호출하기
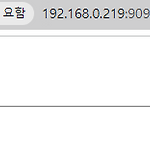
Direct Indexing을 설정하면 되는데, 이것은 별도의 html 파일을 생성하지 않고도 간편하게 파일 다운로드를 하는 방법입니다. 설정에 'autoindex on' 추가 - 경로 : /etc/nginx/conf.d - 파일명 : xx.conf ※ /etc/nginx/nginx.conf 설정에 'http { include /etc/nginx/conf.d/*.conf }' 만 추가되어있으면 xx에 어떤 파일명이라도 상관없음 1 2 3 4 5 6 7 8 9 10 server { listen 9091; server_name _; location / { root /strategy; autoindex on; # 디렉토리 인덱스 활성화 try_files $url $url/ =404; } } cs