써먹는 웹개발
[Elasticsearch] 데이터를 추가하는 4가지 방법 본문
728x90
반응형
Elasticsearch 관련하여 데이터를 추가하는 4가지 방법에 대해 써보려고 한다.
※ 추가적인 방법이나 각각의 장단점을 알고계신 분이 있다면 댓글 부탁드립니다.
0. 인덱스 추가 (인덱스라 인덱스명을 i_로 시작하게 지음)
|
1
2
3
4
5
6
7
8
9
10
11
12
13
14
15
16
17
18
19
|
PUT i_exam
{
"mappings": {
"_doc": {
"properties": {
"SEQ_NUM": {
"type": "integer"
},
"EXAM_ID": {
"type": "text"
}
}
}
},
"settings": {
"number_of_shards" : 3,
"number_of_replicas" : 2
}
}
|
cs |
1. post
- json 파일에 추가해서 파일 실행도 가능
|
1
2
3
4
5
|
POST _bulk
{ "index" : { "_index" : "classes", "_type" : "class", "_id" : "1" } }
{"title" : "Machine Learning","Professor" : "Minsuk Heo","major" : "Computer Science","semester" : ["spring", "fall"],"student_count" : 100,"unit" : 3,"rating" : 5, "submit_date" : "2016-01-02", "school_location" : {"lat" : 36.00, "lon" : -120.00}}
{ "index" : { "_index" : "classes", "_type" : "class", "_id" : "2" } }
{"title" : "Network","Professor" : "Minsuk Heo","major" : "Computer Science","semester" : ["fall"],"student_count" : 50,"unit" : 3,"rating" : 4, "submit_date" : "2016-02-02", "school_location" : {"lat" : 36.00, "lon" : -120.00}}
|
cs |
3. 엑셀의 csv -> Kibana 데이터 연동
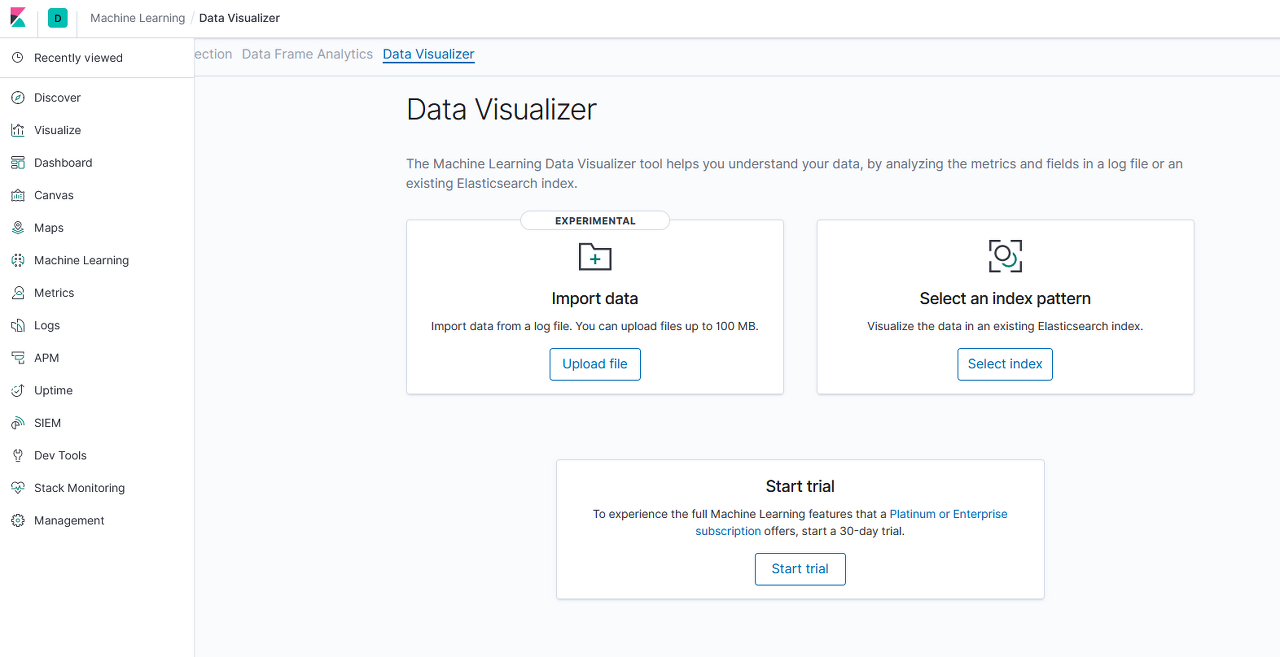
- 100mb 이하인 경우에 Kibana 메뉴에서 Machine Learning 클릭 -> Select an Index pattern에서 csv 파일을 올리면 스스로 field 분석까지 끝내고 인덱스 패턴까지 만들어준다.

※ 책 '나만의 데이터 분석 플랫폼 엘라스틱 서치'의 저자가 데이터를 10만건씩 5분 단위로 추가했다고 한다.
4. csv 파일을 logstash로 데이터 연동
1) CSV 파일 예시
※ 파일명 bitcoin.csv
|
1
2
3
4
5
6
7
8
9
10
11
|
datetime,market-price
2019-05-04 00:00:00,5657.14
2019-05-05 00:00:00,5771.08
2019-05-06 00:00:00,5717.66
2019-05-07 00:00:00,5684.47
2019-05-08 00:00:00,5755.72
2019-05-09 00:00:00,5936.72
2019-05-10 00:00:00,6146.91
2019-05-11 00:00:00,6348.02
2019-05-12 00:00:00,7248.31
2019-05-13 00:00:00,6978.63
|
cs |
2) logstash 구성 파일 생성
- 명령어 : vi /logstash-csv.conf
|
1
2
3
4
5
6
7
8
9
10
11
12
13
14
15
16
17
18
19
20
21
22
23
24
25
26
27
28
29
30
31
32
33
|
input {
file {
path => "https://d1ny9casiyy5u5.cloudfront.net/downloads/bitcoin.csv"
start_position => beginning
sincedb_path => "/dev/null"
}
}
filter {
csv {
columns => [
"datetime",
"market-price"
]
separator => ","
}
date {
match => [ "datetime", "yyyy-MM-dd HH:mm:ss"]
timezone => "America/Sao_Paulo"
target => ["@timestamp"]
}
mutate {convert => ["market-price", float]}
}
output {
stdout
{
codec => rubydebug
}
elasticsearch {
action => "index"
hosts => ["192.168.100.9:9200"]
index => "bitcoin"
}
}
|
cs |
3) Logstash 서비스를 중지하고 스타우징합니다.
3-1) 중지
|
1
|
service logstash stop
|
cs |
3-2) 스타우징
|
1
|
/usr/share/logstash/bin/logstash -f /downloads/logstash-csv.conf
|
cs |
4) 인덱스가 만들었는지 확인합니다.
4-1) 명령어
|
1
|
curl -X GET "http://192.168.100.1:9200/_cat/indices?v"
|
cs |
4-2) 확인 결과
|
1
2
3
4
5
6
7
8
|
health status index uuid pri rep docs.count docs.deleted store.size pri.store.size
green open .kibana_task_manager_1 arJs7udNRoymWLFxYTNB9A 1 0 2 1 37.9kb 37.9kb
green open ilm-history-1-000001 TNmMwUNqR_GgUXhcJBqOMA 1 0 18 0 25.4kb 25.4kb
green open .apm-agent-configuration HpM_nF9FQpWnE2--1tsrFg 1 0 0 0 283b 283b
yellow open logstash-2020.05.02-000001 0CPj2NgvRhWNX_xl-VZHfA 1 1 2246571 0 198.3mb 198.3mb
yellow open accounts DOkqMmYSQhSRllfkfT842g 1 1 2 0 10.5kb 10.5kb
green open .kibana_1 I8JqCPO_TRKAvqtpkb-ksQ 1 0 13 5 20.5kb 20.5kb
yellow open bitcoin 4fm3d-7pRNiPedKPJmqjPA 1 1 11 0 9.7kb 9.7kb
|
cs |
5) 데이터를 확인합니다.
5-1) 명령어
|
1
|
curl -X GET "http://192.168.100.1:9200/bitcoin/_mapping?pretty"
|
cs |
5-2) 확인 결과
|
1
2
3
4
5
6
7
8
9
10
11
12
13
14
15
16
17
18
19
20
21
22
23
24
25
26
27
28
29
30
31
32
33
34
35
36
37
38
39
40
41
42
43
44
45
46
47
48
49
50
51
52
53
54
55
56
57
58
59
60
61
62
63
64
65
66
67
68
|
{
"bitcoin" : {
"mappings" : {
"properties" : {
"@timestamp" : {
"type" : "date"
},
"@version" : {
"type" : "text",
"fields" : {
"keyword" : {
"type" : "keyword",
"ignore_above" : 256
}
}
},
"datetime" : {
"type" : "text",
"fields" : {
"keyword" : {
"type" : "keyword",
"ignore_above" : 256
}
}
},
"host" : {
"type" : "text",
"fields" : {
"keyword" : {
"type" : "keyword",
"ignore_above" : 256
}
}
},
"market-price" : {
"type" : "float"
},
"message" : {
"type" : "text",
"fields" : {
"keyword" : {
"type" : "keyword",
"ignore_above" : 256
}
}
},
"path" : {
"type" : "text",
"fields" : {
"keyword" : {
"type" : "keyword",
"ignore_above" : 256
}
}
},
"tags" : {
"type" : "text",
"fields" : {
"keyword" : {
"type" : "keyword",
"ignore_above" : 256
}
}
}
}
}
}
}
|
cs |
728x90
반응형
'Study > Elasticsearch' 카테고리의 다른 글
| [aws] s3 엔드포인트(endpoint) 값 (0) | 2021.06.04 |
|---|---|
| [Elasticsearch 펌] amazon elasticsearch 설치방법과 주의사항 (0) | 2021.06.03 |
| [Elasticsearch] bulk로 데이터를 한번에 추가/수정/삭제 (0) | 2021.05.17 |
| [Elasticsearch] 조회 시간 단축 방법 : multisearch (0) | 2021.05.17 |
| [Elasticsearch] Linux 설치 이후부터 Elasticsearch, logstash, kibana 설치 및 실행할때 참고한 사이트 (0) | 2021.05.12 |
Comments
